Introduction
Moving to a new home can be stressful enough without worrying about how to transport your beloved bicycle safely. Whether you’re planning a cross-country move or just relocating across town, properly packing and moving a bicycle requires careful planning and the right approach. This comprehensive cycling moving guide will help you navigate every step of the process, ensuring your bike arrives at your new destination in perfect condition.
The Pre-Packing Checklist: Preparing Your Bike
Before disassembling a bicycle, proper preparation is essential. Begin by gathering all the necessary bicycle tools for the job. Important items include Allen keys (hex wrenches), a pedal wrench, cable cutters, and zip ties. Having the right tools on hand will make the entire process smoother and prevent potential damage to your bike’s components.
Bike maintenance should be your first priority. Clean your bicycle thoroughly, removing any dirt, grease, or debris that could cause problems during transport. This is also an excellent opportunity to inspect your bike for any existing damage or wear. Document any issues with photos, as this can be helpful if you’re using a bike transport service or need to file an insurance claim later.
Pay special attention to protecting bike components during this initial inspection. Check that all bolts are properly tightened, cables are in good condition, and there are no loose parts that could shift during transport. This preliminary assessment will help you identify which components need extra protection during packing.
How to Disassemble Your Bike for Transport
Disassembling a bicycle might seem daunting, but with the right approach, it’s quite manageable. Start with removing the pedals and handlebars. Pedals typically unscrew counterclockwise on the left side and clockwise on the right side – remember “lefty loosey, righty tighty” applies differently to each pedal.
When removing handlebars, you’ll need to disconnect brake and shift cables carefully. Take photos before disconnecting anything to help with reassembly later. Loosen the stem bolts and carefully remove the handlebars, keeping all cables attached but loosened.
Taking off the wheels is usually the most straightforward part of the process. Release the brakes if you have rim brakes, then open the quick-release levers or unscrew the axle nuts. Remove both wheels and set them aside. If you have disc brakes, be careful not to squeeze the brake levers once the wheels are removed, as this can cause the brake pads to rub against each other.
Choosing the Right Packing Method
Your choice of packing method will significantly impact how well your bike survives the move. A bicycle box is often the most economical option and works well for most situations. Many bike shops offer a used bicycle box for free, making this an attractive option for budget-conscious movers.
For valuable or delicate bikes, investing in a hard-shell bike case or bike travel case provides superior protection. These cases are designed specifically for bicycle packing and offer excellent protection against impacts and rough handling. While more expensive, they’re reusable and provide peace of mind for expensive bicycles.
The DIY bikepacking approach, using alternative materials, can be both creative and cost-effective. Some cyclists successfully use large cardboard boxes, moving blankets, and creative padding solutions. However, this method requires more time and careful planning to ensure adequate protection.
Securing and Protecting Your Bike
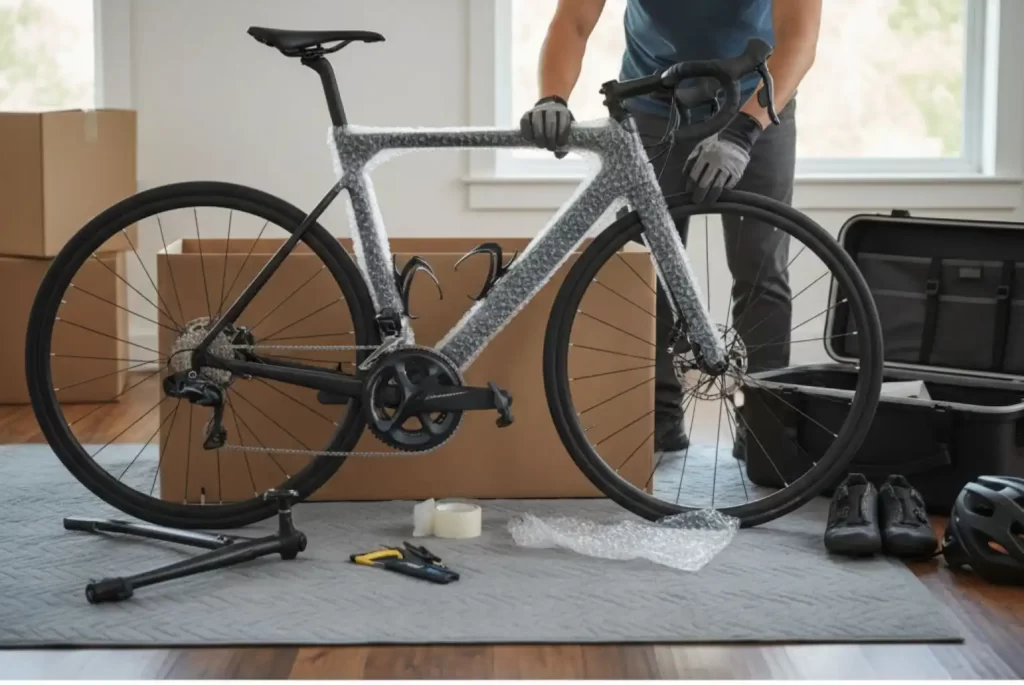
Proper protection is crucial for a successful move. Bubble wrap for bikes is your best friend when it comes to protecting delicate components. Wrap the frame, fork, and any remaining attached components generously. Pay special attention to areas where components might rub against each other or the box.
Foam padding for bikes provides excellent shock absorption. Use foam pipe insulation around the frame tubes and fork legs. Pool noodles cut lengthwise can also serve as effective and inexpensive frame protection. The goal is to create a cushioned barrier that prevents movement and absorbs impacts.
When securing components inside the box, use zip ties and tape to prevent shifting. Wheels should be positioned to protect the frame, often on either side of the main triangle. Some cyclists place cardboard between the wheels and frame for additional protection. All small parts, such as pedals, quick-release skewers, and accessories, should be placed in clearly labeled bags.
Transporting Your Bicycle: Your Options
Shipping a bicycle through a bike courier or traditional shipping service offers convenience, but it also comes with considerations regarding bicycle shipping costs and handling. Research different carriers and compare their bike transport service options. Some companies specialize in bicycle shipping and offer better protection and handling procedures.
Flying with a bicycle requires understanding airline policies and fees. Each airline has different rules about bike transport, size restrictions, and additional charges. Book early and confirm your bike’s dimensions meet the airline’s requirements. Consider partially inflating tires to prevent damage from pressure changes.
Moving a bike by car using a bike rack for car is often the most controlled method. You maintain direct control over handling and can monitor your bike throughout the journey. However, this option isn’t practical for long-distance move situations or when you need to ship your belongings separately.
Post-Move: Reassembling Your Bike
Once you’ve arrived at your destination, careful reassembly is crucial for safety and performance. Start by laying out all components and checking that nothing was damaged during transport. Follow your photographs and reverse the disassembly process step by step.
Begin with reinstalling the wheels, ensuring proper alignment and secure attachment. Reattach the handlebars, carefully reconnecting brake and shift cables according to your reference photos. Proper cable tension is crucial for safe operation, so take your time with this step.
Install the pedals, remembering the different threading on each side. A drop of grease on the pedal threads can prevent seizing and make future removal easier. Once everything is reassembled, perform thorough safety checks before your first ride.
Conclusion: Stress-Free Bicycle Moving
Moving a bike doesn’t have to be a source of anxiety in your relocation tips arsenal. With proper planning, the right materials, and careful execution, you can ensure your bicycle arrives safely at your new home. Whether you choose a professional moving company for bikes services or handle the DIY bike packing yourself, the key is preparation and attention to detail.
Remember that this process is part of your overall moving checklist, and like other aspects of your move, it benefits from starting early and staying organized. Consider this moving guide as your roadmap to a successful bicycle relocation.
The investment in time and materials for proper bicycle packing is small compared to the cost of repairing or replacing a damaged bike. Take your time, follow these bike packing tips, and you’ll soon be exploring new cycling routes from your new home.
Whether this is your first move with a bicycle or you’re a seasoned relocator, these strategies will help ensure your stress-free moving experience includes keeping your trusted two-wheeled companion safe and ready for new adventures in your new location.

